 conveniently links the two exposures that is very useful for doing ratios. to lock in the exposure ratio.
 HCImage supports simultaneous dual CCD![]() See Charged-Coupled Device. or dual camera acquisition. The software incorporates multi-view for a dual CCD camera in the case of the ORCA-D2 or two matched cameras using a the proper frame grabber. Each CCD can be individually controlled for gain and exposure. The Lock function
See Charged-Coupled Device. or dual camera acquisition. The software incorporates multi-view for a dual CCD camera in the case of the ORCA-D2 or two matched cameras using a the proper frame grabber. Each CCD can be individually controlled for gain and exposure. The Lock function  conveniently links the two exposures that is very useful for doing ratios. to lock in the exposure ratio.
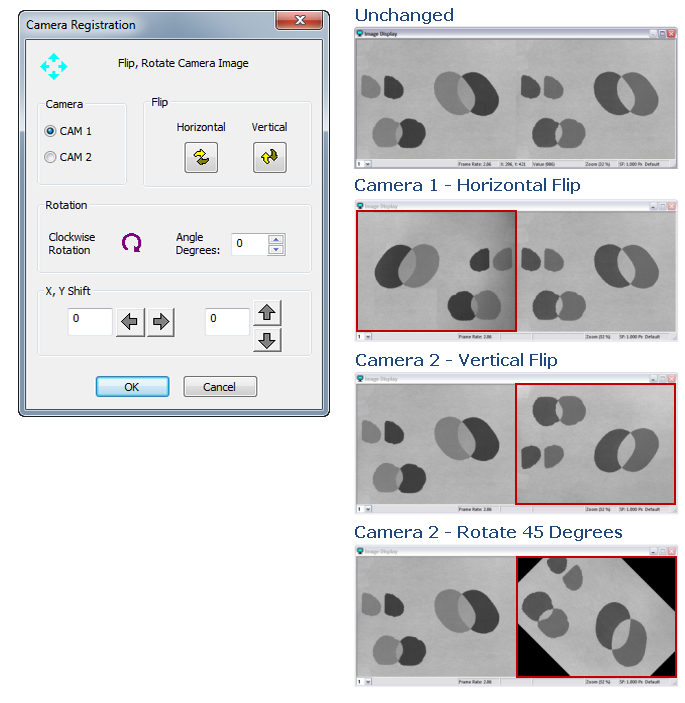
Live images may be displayed side-by-side or overlaid RG. Stream image sequences in the same manor. Adjust CCD or camera alignment using horizontal/vertical flip with rotation.
Note: Some cameras boards are not capable of supporting dual cameras. If this is the case, each camera will require its own board. The matching cameras (i.e., the same camera models) may be added as a dual camera with the same functionality except it acquire image sequentially, not simultaneously. The reason for sequential acquisition is the fact that there are two boards, which means two signals must be sent, one to each board. Even at best, the two signals would be separated by a couple of CPU cycles and thus it is not simultaneous.
The ORCA-D2 has two modes of operation, it can operate as a dual CCD camera or as a single CCD camera. When operating in the dual CCD mode, the ORCA-D2 captures images simultaneously from both CCDs. Each CCD has independent camera controls but they work as a single camera. The ORCA-D2 can also operate as a single CCD camera and in this mode each CCD is a separate camera. To select a mode or to switch modes use the camera drop-menu located at the top of the Capture pane. The list below is an example of the ORCA-D2 camera selections followed by the mode of operation.
The user can select between three capture modes: Capture RGB Color 2-Band, Capture Mono 2 Channel and Capture Mono 1 Channel. To select a capture mode go to the Capture panel and click on the drop-menu above the Live button. The Camera Control pane is modified based on the capture mode selected. The various capture modes for are explained in detail below.
The RGB Color 2-Band mode displays a merged red-green image from the two CCDs or cameras. Exposure and gains adjustments may be made to the individual CCDs or cameras by clicking the 1 or 2 buttons in the Camera Control panel.

The Mono 2 Channel (side-by-side) mode displays the two images side-by-side. Exposure and gains adjustments may be made to the individual CCDs or cameras by clicking the 1 or 2 buttons in the Camera Control panel.

This mode lets the user select a single CCD or camera to display. To select this mode go to the Capture pane and select Capture Mono 1 Channel from the drop-menu. Click on the 1 or 2 button to select the desired CCD or camera image to display and click Live.

Note: Only one channel is shown (or captured) while in Mono 1 Channel Mode. Switch between the two channels by using the 1 and 2 buttons in the Camera Control pane.
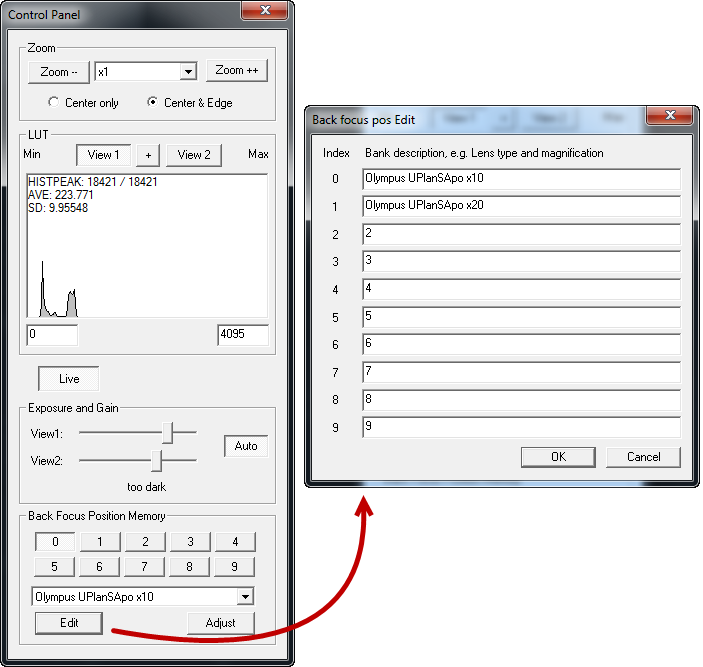
The ORCA-D2 can adjust the focus of both CCD1 and CCD2 respectively. CCD1 can be adjusted by using the Z focus on the microscope. CCD2 can be adjusted by using the linear stage in the camera head. This allows the ORCA-D2 to observe the best focus on both images at the same time. HCImage can memorize up to 10 positions of CCD2 for each optical block. This means that users can store the back focus positions for 10 objective lenses with one optical block. The Back Focus Control panel (shown below) allows users to adjust and save parameters easily and is located in the Capture pane.

The Back Focus Control panel has a simplified set of controls that are easily accessible and can be hidden when not in use. To adjust the back focus position use the following steps:
Customize the name of the position presets by entering the objective type and magnification using DCAMCAP. Use the following instructions to create custom names for the preset positions:

The Camera Registration feature allows the users while Live to flip and rotate the image from each CCD or camera. Click on the Registration button in the Advanced Camera Properties pane to open the Camera Registration dialog. The simplified controls are easy to use; see the example below.
